
Source Engine Single Player Mod Setup
This is a walkthrough of how to setup a basic single player mod for the Source Engine.
At the end of this tutorial you will have a functioning single player mod that will behave just like Half-Life 2 Episode 2.
What to Do If You Run into Issues
If you run into a problem the fastest way is to ask a question on the Steam Source SDK Forums, Reddit, or the Source Engine Discord. But do be sure to search first, often someone else has already had the same problem and solved it!
You can email me directly but I respond the fastest to posts on the Source SDK forums since Steam puts the alert in my face.
Video Version of This Tutorial
Don’t feel like reading or need a visual aid? Check out the video!
NOTE: There are some differences now between this video and the written version, the video is from 2015 and since then I’ve updated/improved the documentation
Things You Will Need to Download
Required
- The source code for the 2013 branch off of GitHub, preferably you are forking and using git control.
If you are new to git there are a ton of great tutorials out there on it
- Visual Studio 2013 Community Edition (scroll down to 2013, click Download, and sign in with your Microsoft account), yes you can just use the compiler but this tutorial was made with VS2013 CE in mind.
See Building Without Visual Studio on the VDC for a tutorial on that
-
Multibyte MFC Library, install AFTER VS 2013 is installed
-
Install Source SDK Base 2013 Single Player on Steam
Prompt Steam to Install or find it in the Tools section
Once installed right click and choose properties then go to the betas tab and choose “upcoming”
- Notepad++, Visual Studio Code, or any other editor for working with text files that is NOT notepad or Word
Optional
- Microsoft Speech SDK 5.1 if you are wanting to do anything that isn’t directly gameplay related such as shaders (the everything.sln requires it for compiling), just pick
SpeechSDK51.exe
Setting up the Work Directory
Create the directory you want your mods source files to live in while you are working on it. Personally I like to have a “working” directory that houses all of my projects, so in my case it is going to be D:/working/myfirstmod
Make sure there are no spaces in your directory name, having spaces will cause issues!
Now in your new directory create another called “code”, this is where we will be storing the code portion of your mod. So go ahead and either unzip your copy of Source SDK 2013 from GitHub or if you are using git control clone into this directory.
Open up your copy of the source code and you will notice two directories, sp and mp, being named after single player and multiplayer respectively. We do not need the multiplayer version so go ahead and select that directory and delete it.
Setting up the Mod Directory
Navigate to your primary Steam directory, where steam.exe lives, and go into steamapps and then sourcemods. If you installed Steam with all the defaults on your default C drive it is probably: C:\Program Files (x86)\Steam\steamapps\sourcemods.
In this directory go ahead and make a directory that is the same name as your mod and enter it.
Make sure there are no spaces in your directory name, having spaces will cause issues!
In here make the following directories:
- bin
- cfg
- maps
- materials
- models
- resource
- scripts
- sound
Setting up Microsoft Speech SDK (SAPI)
If you are not using this (as in you do not need to compile the “everything” project) then skip this section, otherwise read on.
Run the SpeechSDK51.exe that you downloaded earlier. It should unzip contents into a directory of your choice. One of the contents it unzips is Microsoft SDK 5.1.msi. Running this with the default settings should create a directory called Microsoft Speech SDK 5.1 in your Program Files (x86) directory. Copy that directory and it’s contents into \sp\src\utils of your mods source code directory and rename it to sapi51.
In sp\src\utils\sapi51\Include open up the sphelper.h file in an editor of your choice, the following changes need to be made to it:
Line 769:
const size_t ulLenVendorPreferred = wcslen(pszVendorPreferred); // no size_t
Line 1418:
static long CoMemCopyWFEX(const WAVEFORMATEX * pSrc, WAVEFORMATEX ** ppCoMemWFEX) // missing long
Line 2368:
const WCHAR * PropertyStringValue() const
   {
       // Search for the first NULL and return pointer to the char past it.
       SPDBG_ASSERT(eEventId == SPEI_PROPERTY_STRING_CHANGE);
       const WCHAR * psz = (const WCHAR *)lParam; // moved this from for init
       for (; *psz; psz++) {}
       return psz + 1;
   }
Line 2560:
SPPHONEID* pphoneId = (SPPHONEID*)((WCHAR *)dsPhoneId); // improper casting
Line 2634:
pphoneId += wcslen((const wchar_t *)pphoneId) + 1; // improper casting
Setting up the Codebase and Compiling it
Navigate to your spc/src directory.
Run creategameprojects.bat and you will see it makes a games.sln, this is the solution file and is used for organizing the project. Go ahead and open it up in Visual Studio 2013 CE.
Right click Solution 'games' (8 projects) in the Solution Explorer and choose Properties
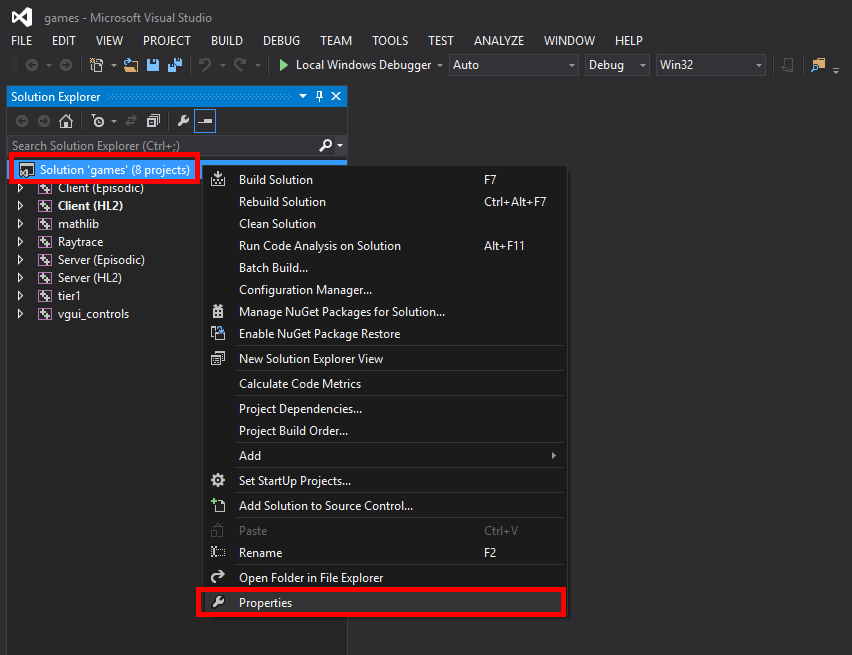
On the left side of the properties menu click on Configuration under Configuration Properties and then click Configuration Manager... in the upper right.
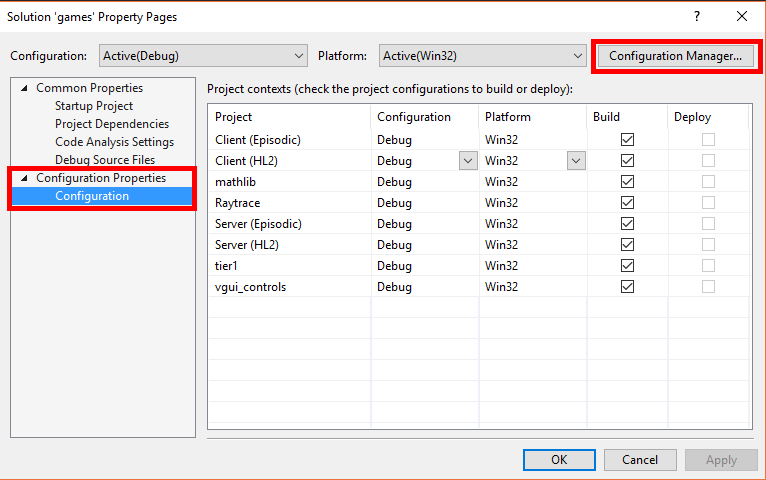
In the Configuration Manager under Active solution configuration: choose Release from the drop down.
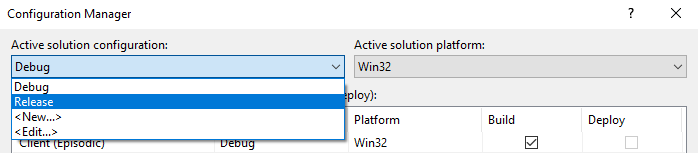
Click close and then OK to exit out of both the configuration manager and the properties menus.
In the menu bar at the top click Build then click Rebuild Solution (or press ctrl+Alt+F7) and wait for the build to finish.
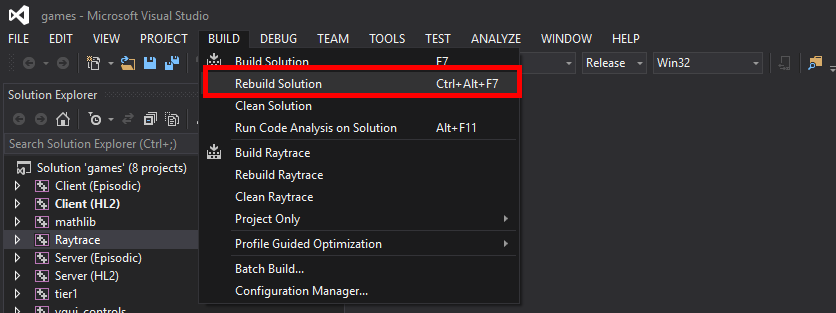
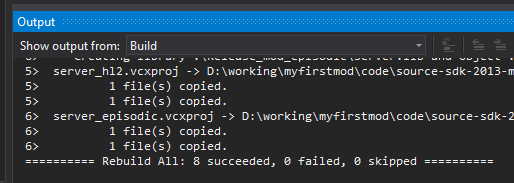
If everything was setup properly you will get a nice output that tells you that there were 8 successes, 0 fails, and 0 skips.
Getting the Binaries
Your mod needs both a client.dll and server.dll to run properly which is why we compiled the code earlier. Compiling the code gives us binaries for the engine to use.
In your source code directory, sp\src, navigate to game and you will see three directories: client, server, and shared. To begin let’s get the client.dll. Go into the client directory followed by the Release_mod_episodic directory. In here you will find a lot of .obj files but the one we are looking for is a .dll, so either search using *.dll or sort by type. Copy the client.dll once you have found it into your mods bin directory. Do exactly the same for server.
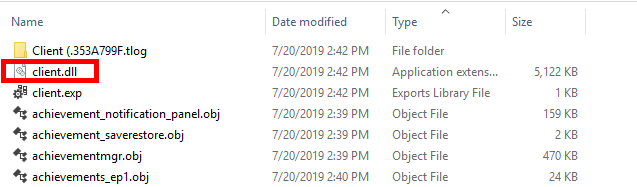
Once you are done your bin directory should contain both client and server .dll files.
We can also automate this process using what is known as a post build event.
In Visual Studio right click Client (Episodic) in the Solution Explorer and select properties just like we did earlier with the solution.
On the left side look for Build Events and expand that and choose Post-Build Event
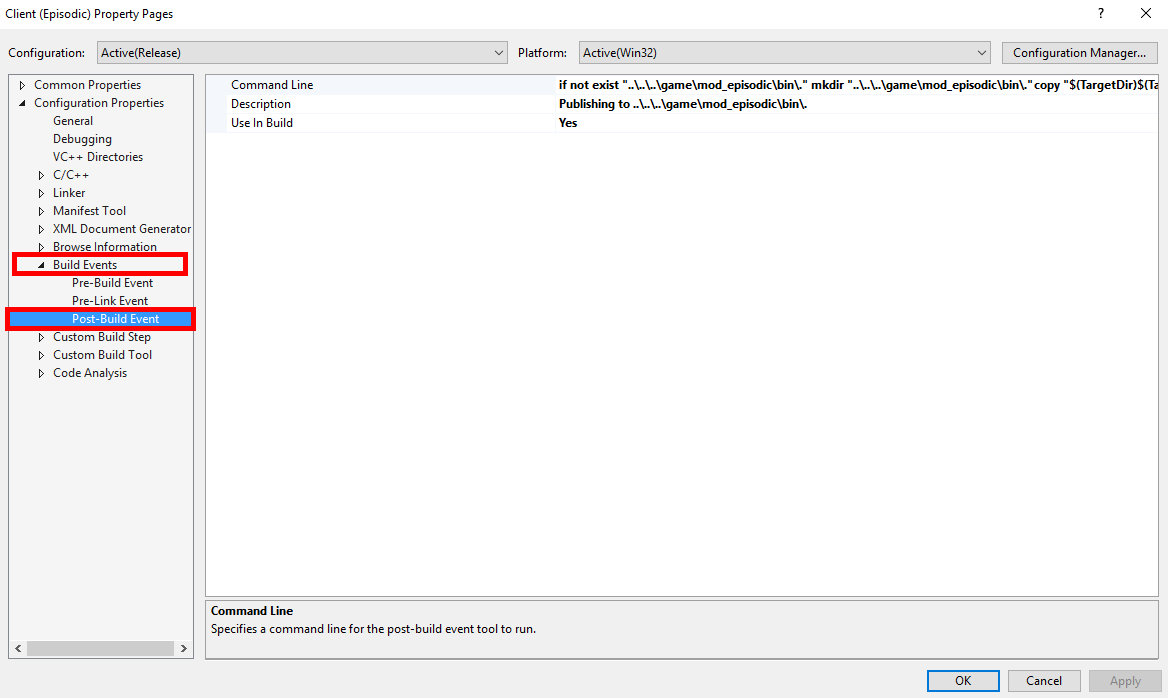
Click on Command Line and then the drop down arrow to the right and choose <Edit...>

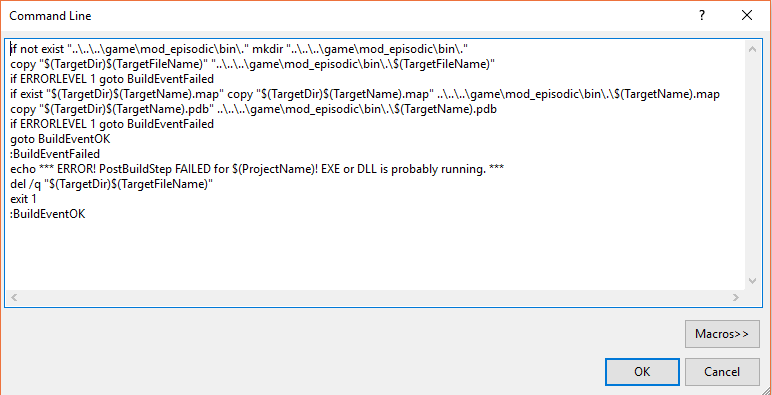
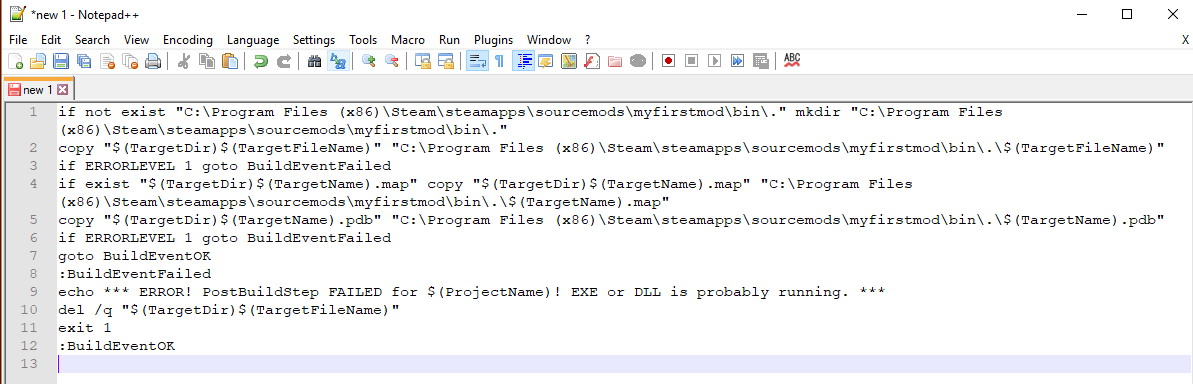
A window titled Command Line will open up, inside of it is the batch script that will run after it is done compiling. If you look closely you will see it has the line
copy "$(TargetDir)$(TargetFileName)" "..\..\..\game\mod_episodic\bin\.\$(TargetFileName)"
This line of the script is saying “Copy the dll into a directory. That directory is 3 levels up from where you are now (..\..\..\) and then down into game\mod_episodic\bin\. and the copied file is still going to have the same name as the original, $(TargetFileName).
We of course want the dll’s going into our mods bin directory so let’s change this. To start select the entire script and copy it into a different editor like Notepad++.
Select the text ..\..\..\game\mod_episodic\bin and press CTRL+H to bring up the Find Replace feature of Notepad++, if you are using a different text editor it most likely has the exact same function with a different hoteky.
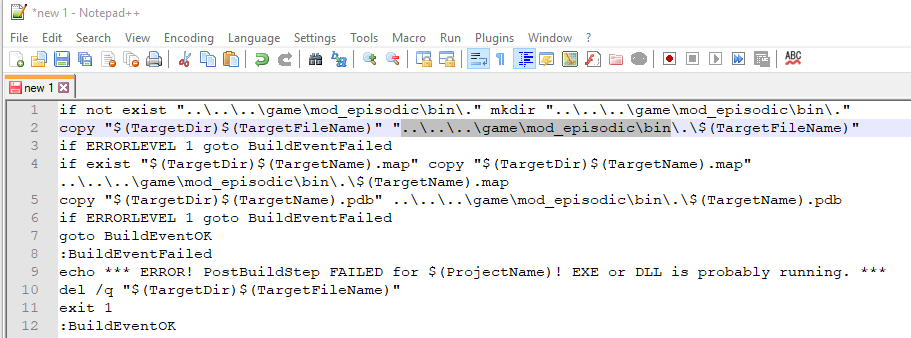
We now want to replace all instances of ..\..\..\game\mod_episodic\bin with our mods bin directory. In my case that is C:\Program Files (x86)\Steam\steamapps\sourcemods\myfirstmod\bin and then press Replace All.
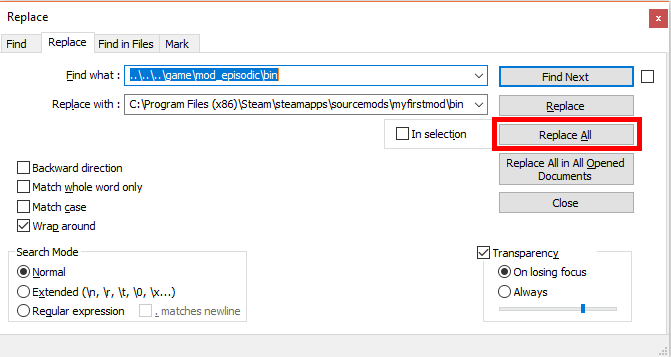
If your directory path contains spaces in it such as
C:\Program Files (x86)\Steam\steamapps\sourcemods\myfirstmod\binit must be wrapped in double quotes!
Select all of your modified script and copy it back into the Visual Studio Command Line window and press OK to close the window. Press OK again to apply and close the Properties Page of Client (Episodic).
You now need to do the exact same thing for Server (Episodic) but the good news is you can just reuse the same exact script you modified.
Now if you do a rebuild you will see it puts the dlls into your mods bin directory!
NOTE: dlls are only copied when a successful build happens, so if you do not make any changes to server then the dll will not be copied for example.
Original Script Modified Script
Gameinfo.txt Setup
The gameinfo.txt is a very important part of any Source Engine mod and game. This file tells the engine and Steam not only what your mod is called but what files to mount.
The following are examples of some gameinfo.txt’s from Valve’s games:
Half-Life 2 Half-Life 2 EP2 Portal 2 Team Fortress 2
In your mod directory create a file called gameinfo.txt and copy the following into it:
"GameInfo"
{
	game 		"My First Episodic Mod"
	title 		"HALF-LIFE'"
	title2		""
	supportsvr	1

	type		singleplayer_only

	FileSystem
	{
		SteamAppId				243730		// This sets the app ID in Steam

		//
		// The code that loads this file automatically does a few things here:
		//
		// 1. For each "Game" search path, it adds a "GameBin" path, in <dir>\bin
		// 2. For each "Game" search path, it adds another "Game" path in front of it with _<langage> at the end.
		//    For example: c:\hl2\cstrike on a french machine would get a c:\hl2\cstrike_french path added to it.
		// 3. For the first "Game" search path, it adds a search path called "MOD".
		// 4. For the first "Game" search path, it adds a search path called "DEFAULT_WRITE_PATH".
		//

		//
		// Search paths are relative to the base directory, which is where hl2.exe is found.
		//
		// |gameinfo_path| points at the directory where gameinfo.txt is.
		// We always want to mount that directory relative to gameinfo.txt, so
		// people can mount stuff in c:\mymod, and the main game resources are in
		// someplace like c:\program files\valve\steam\steamapps\half-life 2.
		//
		SearchPaths
		{
			// First, mount all user customizations.  This will search for VPKs and subdirectories
			// and mount them in alphabetical order.  The easiest way to distribute a mod is to
			// pack up the custom content into a VPK.  To "install" a mod, just drop it in this
			// directory.
			//
			// Note that this directory is scanned only when the game is booted.
            game+mod            |gameinfo_path|custom/*

			// Now search loose files.  We'll set the directory containing the gameinfo.txt file
			// as the first "mod" search path (after any user customizations).  This is also the one
			// that's used when writing to the "mod" path.
			mod+mod_write+default_write_path    |gameinfo_path|.
            game+game_write     |gameinfo_path|.

			gamebin				|gameinfo_path|bin

			// We search VPK files before ordinary directories, because most files will be found in
			// VPK and we can avoid making thousands of file system calls to attempt to open files
			// in directories where they don't exist.  (Searching a VPK is much faster than making an operating
			// system call.)
			game_lv				hl2/hl2_lv.vpk
			game+mod			|all_source_engine_paths|ep2/ep2_english.vpk	// EP2 that comes with SDK 2013 SP
			game+mod			|all_source_engine_paths|ep2/ep2_pak.vpk

			game				|all_source_engine_paths|episodic/ep1_english.vpk	// EP1 that comes with SDK 2013 SP
			game				|all_source_engine_paths|episodic/ep1_pak.vpk

			game				|all_source_engine_paths|hl2/hl2_english.vpk	// Base HL2 that comes with SDK 2103 SP
			game				|all_source_engine_paths|hl2/hl2_pak.vpk
			game				|all_source_engine_paths|hl2/hl2_textures.vpk
			game				|all_source_engine_paths|hl2/hl2_sound_vo_english.vpk
			game				|all_source_engine_paths|hl2/hl2_sound_misc.vpk
			game				|all_source_engine_paths|hl2/hl2_misc.vpk

            // If you wanted to mount other games here such as Portal or Counter-Strike Source this is where you would do it
            // Example:
            // game             |all_source_engine_paths|cstrike/cstrike_pak.vpk


			platform			|all_source_engine_paths|platform/platform_misc.vpk

			// Last, mount in shared HL2 loose files
			game				|all_source_engine_paths|episodic
			game				|all_source_engine_paths|hl2
			platform			|all_source_engine_paths|platform
		}
	}
}
Be sure to change the values for game and title to match your mods name!
The CFG Directory
The CFG directory is where you will keep all of your config files for the game. A .cfg file is simply a file that contains commands that will get run when executed.
The .cfg files you should have in your directory:
- modsettings.cfg, runs when the mod starts up
- game.cfg, runs on every map load
- skill.cfg, contains the console variables for various settings for NPC’s and weapons
- skill_manifest.cfg, this is used to run multiple skill.cfg files
- config_default.cfg, the default keybinds
- chapter#.cfg, ran when the player picks that chapter # from the main menu. Normally it’s to load the proper map.
Examples:
Half-Life 2’s skill.cfg Half-Life 2 EP2 skill_episodic.cfg skill_manifest.cfg Half-Life 2 chapter1.cfg config_default.cfg
Valve and other mod teams do various things with cfg’s since they are convient places to store settings that can be applied easily or change. Poke around for some ideas!
The Other Directories
Quick run down on what these other directories are used for, will go into more detail on some of these in later tutorials.
- Maps, you store your map files in here including the .bsp, .nav, and other files you might have added support for such as descriptions like Counter-Strike: Source
- Models/Materials/Sound, these are pretty straight forward the corresponding files go in here and you should try to keep them organized in subdirectories
- Resource, contains fonts, close caption text, icons, cursors, and other UI elements
- Scripts, holds script files for things like soundscapes, weapon scripts, chapter titles, prop_data, sentences, HUD layout, vehicles and a lot more. Definitely dig through the HL2 scripts directory to get an idea
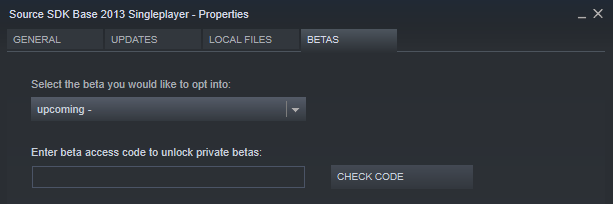
Opt into the Source SDK 2013 Singleplayer Beta
For compatibility reasons with older 2013 based mods, 2013 singelplayer has a beta branch called upcoming that you need to opt into.
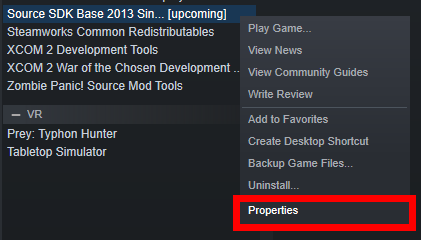
Start by right clicking Source SDK 2013 Singleplayer and selecting properties.
Select the beta tab.

Click the drop down and choose upcoming.
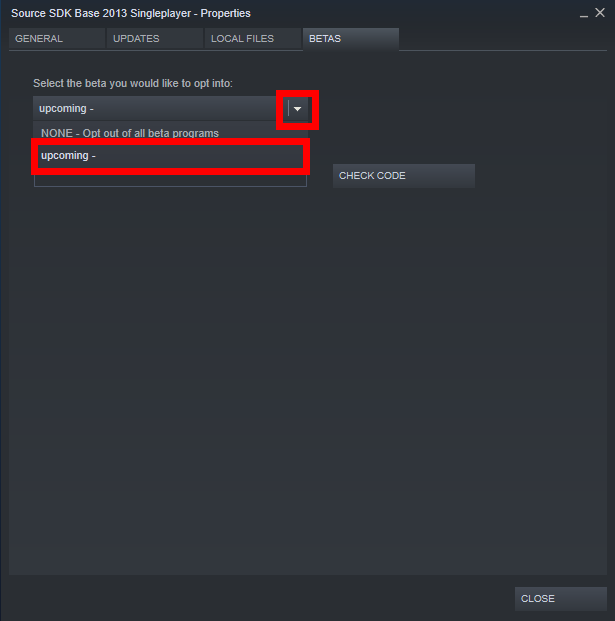
You should notice it now queues up an update, wait for that to finish downloading.
You’re Done!
Restart Steam and you should see your mod show up in the Games section now! Launch your mod and you will end up on the main menu.
NOTE: You will notice the water is missing it’s texture for the default Half-Life 2 EP2 background when you load in. This is an issue with the map being loaded out of a vpk. If you unpack the map from the vpk into your maps folder and launch the game it will be fixed.
If you have feedback feel free to shoot me an email and if you want to buy me a coffee on Ko-fi it would be really appreciated!